How to Fish With Bobber and Bait for Beginners
Stepping into the world of Utah fishing can feel a bit overwhelming, especially when you're faced with an endless array of lures, lines, and complex techniques. Many new anglers get discouraged before they even cast their first line, thinking they need expensive gear or years of experience. But here's a secret: one of the most reliable, enjoyable, and downright effective ways to get started, or even just enjoy a relaxing day, is with a simple bobber and bait rig. This guide is all about simplifying the process, showing you how to confidently set up and fish with bobber and bait, ensuring your first forays into Utah's waters are filled with fun, not frustration.
Why Bobber and Bait is Your Best Friend for Beginning Anglers
Let's be honest, trying to learn advanced fly-fishing casts or master complex jigging techniques can be intimidating when you're just starting out. That's where the humble bobber and bait setup shines. It's the ultimate beginner-friendly technique, offering immediate feedback and requiring minimal skill to get started. It's also incredibly versatile and effective for catching a wide variety of fish species, especially the feisty rainbow trout often stocked in Utah's community ponds and reservoirs.
Simplicity and Accessibility
The beauty of bobber and bait lies in its straightforward nature. You don't need a deep understanding of fish behavior or intricate presentations. The bobber tells you exactly when a fish is biting – it dips, it dances, it disappears! This visual cue is invaluable for new anglers, helping them understand what's happening beneath the surface. It builds confidence quickly, turning those confusing "is that a bite?" moments into clear, exciting affirmations. Plus, the gear required is minimal and affordable, meaning you can get out on the water without breaking the bank. Many tackle shops and even big box stores sell starter kits that include everything you need. For a broader selection, checking out platforms like Amazon can also provide a good overview of options for beginner tackle boxes and rod and reel combos.
Effectiveness for Common Utah Species
While it might seem basic, bobber and bait is a tried-and-true method for catching some of Utah's most popular sport fish. Stocked rainbow trout, for instance, absolutely love a juicy worm or a brightly colored piece of PowerBait dangled right in front of them. These fish are often eager feeders, and the natural presentation of bait makes it irresistible. Even larger fish like catfish in Utah Lake or panfish in smaller ponds will readily take a well-placed bait. This method allows you to target a wide range of species without needing a specialized tackle box for each one. It's about getting bait into the strike zone and letting the fish come to you, which is particularly effective in quieter waters or when fish are holding in specific depths.
Perfect for Family Fishing Trips
If you're looking to introduce kids to the joys of fishing, there's no better way than with a bobber and bait setup. It's inherently engaging; kids love watching the bobber, and the anticipation of it going under is pure magic. It teaches patience, observation, and the thrill of the catch without demanding complex motor skills. You can set them up, cast for them initially if needed, and then let them enjoy the process. Many of Utah's community ponds are specifically designed for family fishing, making them ideal places to practice this technique. Before you head out, remember to check the rules on Do Kids Under 12 Need a Fishing License in Utah? and gather your family's Utah Fishing License Guide beforehand.
Gathering Your Essential Bobber and Bait Gear
You really don't need a huge arsenal of gear to get started with bobber and bait fishing in Utah. In fact, keeping it simple is often the best approach for beginners. Focus on a few key items that are reliable and easy to use.
Rod and Reel Selection for Beginners
For bobber and bait fishing, a spinning rod and reel combo is usually the best choice. They are forgiving, easy to cast, and require minimal upkeep. Look for a rod that's around 6 to 7 feet long with a medium-light or medium action. This length offers a good balance of casting distance and fish-fighting power, and the action will be sensitive enough to feel bites but strong enough to handle common trout or panfish. The reel should be a small to medium-sized spinning reel (typically a 1000 to 3000 series). Many entry-level combos are already spooled with appropriate fishing line, usually monofilament in the 4-8 pound test range. This line strength is perfect for stocked trout and panfish and is forgiving enough for beginners who might get a few snags. You can find excellent value combos at sporting goods stores or even on Amazon, specifically searching for "beginner fishing rod and reel combo." If you're wondering about specifics, checking out advice on the Best Fishing Rod Size for Utah Trout can give you a better idea of what to look for.
The Right Bobber
Bobbers come in many shapes and sizes, but for beginners, two main types are most common: clip-on bobbers and slip bobbers.
- Clip-on Bobbers: These are the classic red and white round bobbers that clip directly onto your line. They're super easy to use – just pinch, attach, and go. They're great for fishing in shallower water where you don't need to cast a long distance or adjust your bait's depth frequently. The downside is that they can make long casts a bit awkward because the bobber is fixed on the line. They are often best for still waters like small ponds or slow-moving streams.
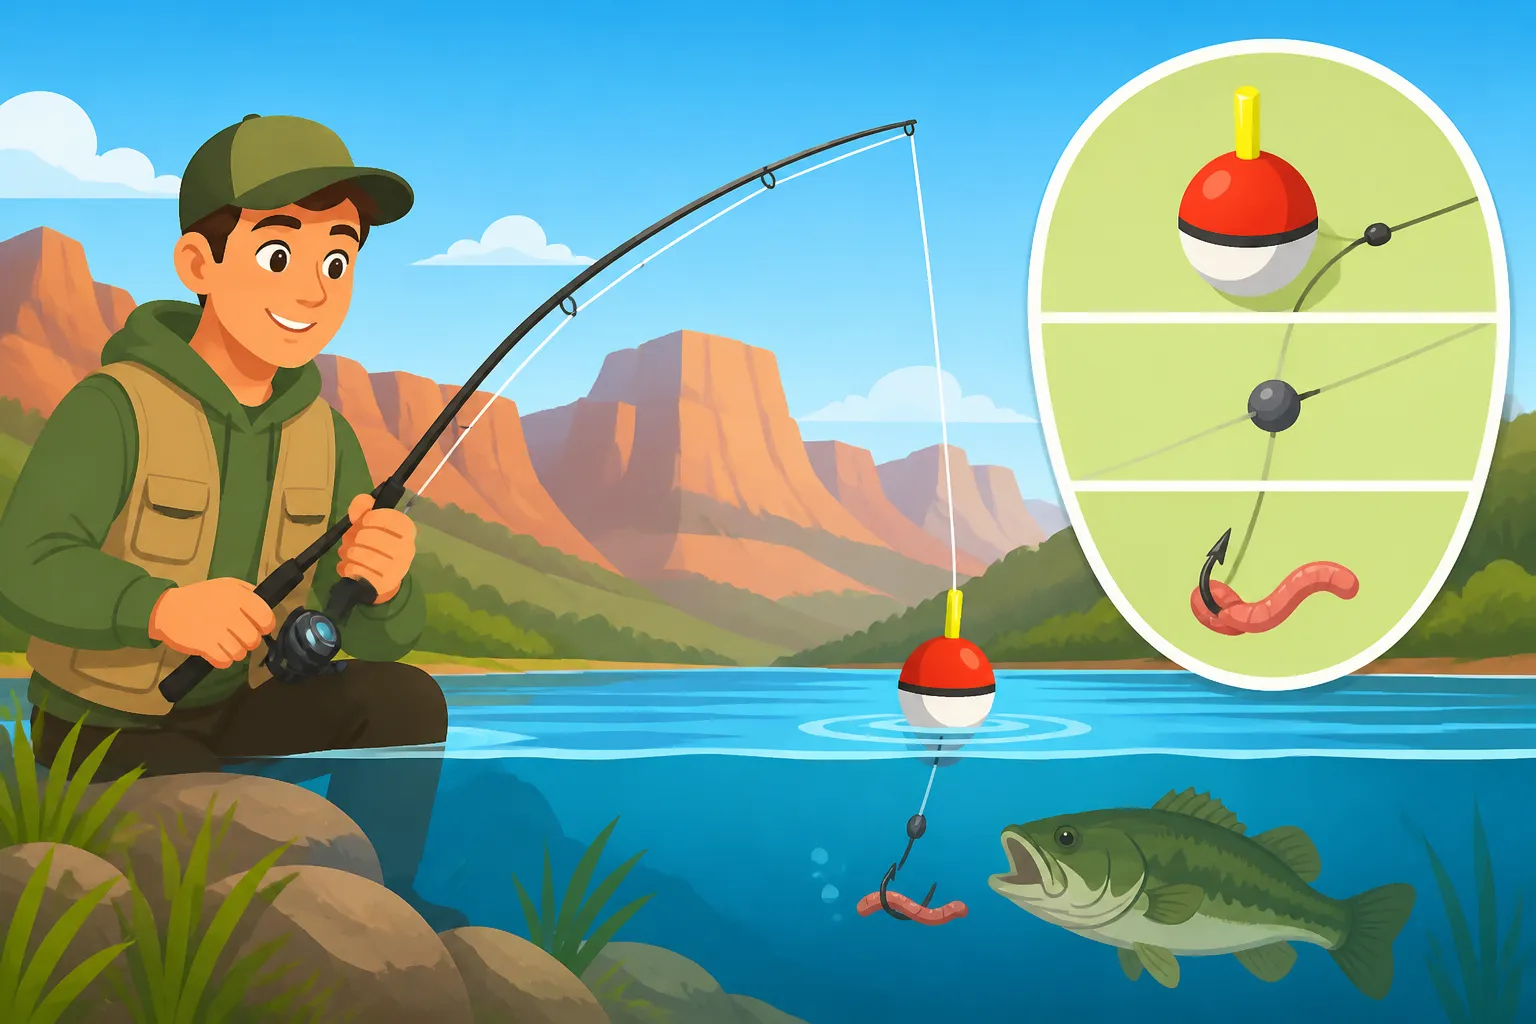
- Slip Bobbers: These bobbers have a hole through the middle, allowing your line to "slip" through them. A small knot (called a bobber stop) is tied onto your line above the bobber, which then stops the bobber at a pre-set depth. This allows you to cast your bait much further, as the bobber and bait are close together during the cast, then the bait sinks to the desired depth. Slip bobbers are fantastic for fishing deeper waters or when you need to make longer casts. They offer more control over the depth of your presentation, which can be crucial when fish are holding at a specific level. You'll also need a small bead between the bobber stop and the bobber to prevent the knot from slipping through the bobber's hole.
Hooks, Weights, and Swivels
The terminal tackle – the bits at the end of your line – is crucial for a successful bobber and bait setup.
- Hooks: For most beginner bobber and bait fishing in Utah, especially for trout, a size 6 or 8 single baitholder hook is ideal. Baitholder hooks have small barbs on the shank to help keep your bait from sliding off. For smaller panfish, you might go down to a size 10 or 12, and for larger species like catfish, a sturdier size 2 or 4 hook might be needed. The key is to match the hook size to your bait and the size of the fish you expect to catch. Need more details? Check out What Size Hook Should You Use for Utah Stocked Trout?
- Weights (Sinkers): Small split-shot weights are perfect. These are tiny lead or steel balls that pinch onto your line. You'll typically place one or two about 6-12 inches above your hook to help your bait sink and keep it somewhat stationary. The goal is just enough weight to get your bait down and keep your bobber standing upright without pulling it completely under. Too much weight will make your bobber too sensitive or even sink it, and too little will prevent your bait from getting to the fish.
- Swivels: While not always strictly necessary for bobber and bait, a small barrel swivel placed between your main line and your leader (a shorter, often lighter piece of line tied to your hook) can prevent line twist, especially if you're using bait that spins in the water. It also makes it easy to change out your leader and hook setup without retying your main line.
Choosing Your Bait
This is where the fun begins! The best bait often depends on what you're fishing for and where.
- Worms: The classic. Nightcrawlers or smaller garden worms are universally appealing to almost all freshwater fish, especially trout, bass, and panfish. They're natural, readily available at bait shops (and sometimes in your backyard!), and very effective. Hook them once or twice through the body, letting the ends wriggle freely.
- PowerBait: A Utah trout favorite! This moldable dough bait comes in various colors and scents. Pink, chartreuse, and rainbow are popular for stocked trout. Pinch off a pea-sized amount, roll it into a ball, and completely cover your hook. This bait floats, so it will rise above your sinker, giving it a natural presentation off the bottom. Check out What Color PowerBait Works Best in Utah Reservoirs? for more specific tips.
- Corn: Believe it or not, canned corn is a surprisingly effective bait for trout and panfish, particularly in stocked ponds. It's cheap, easy to find, and fish seem to love its bright color and sweet taste. Use a few kernels on a small hook.
- Minnows: For larger predatory fish like bass or walleye, live minnows can be incredibly effective. However, there are strict rules in Utah about using live baitfish and transporting them, often to prevent the spread of aquatic invasive species. Always check the current Utah Aquatic Invasive Species Rules for Anglers before using live minnows.
- Marshmallows: Another floating bait, similar to PowerBait in its presentation. They can be very effective for trout, especially when sweetened with garlic or anise scents.
- Crayfish: For bass and catfish, small live or dead crayfish can be a prime meal. Just like minnows, be mindful of local regulations regarding their use.
Here's a quick comparison of common baits:
| Bait Type | Target Species | Pros | Cons |
|---|---|---|---|
| Nightcrawlers | Trout, Bass, Catfish, Panfish | Natural, universally appealing, active | Can be messy, harder to keep on hook, perishable |
| PowerBait | Stocked Trout | Floats, strong scent, vibrant colors, easy to use | Less effective for non-trout species, artificial scent |
| Canned Corn | Trout, Panfish | Cheap, easy to find, effective | Less durable on hook, less scent than PowerBait |
| Live Minnows | Bass, Walleye, Perch, Catfish | Natural, highly effective for predators | Regulations (AIS), need aeration, can be expensive |
| Marshmallows | Trout | Floats, easy to use, fun for kids | Less scent, can dissolve quickly |
Remember, carrying a small variety of baits is a good idea. Fish can be finicky, and what works one day might not work the next. A good Utah Fishing Gear Guide will often suggest a basic tackle box with a few options.
Setting Up Your Rod: Step-by-Step Rigging
Getting your bobber and bait rig set up correctly is crucial. Don't worry, it's not as complicated as it might seem! Just take it one step at a time.
Tying the Basic Knots
Before you can fish, you need to tie a few knots. The most important one for beginners is the Improved Clinch Knot, used to attach your hook, swivel, or lure to your line.
- Thread the Line: Pass the end of your fishing line through the eye of the hook (or swivel).
- Twist: Wrap the tag end (the short end) of the line around the main line 5-7 times.
- First Loop: Pass the tag end back through the first loop created right above the hook eye.
- Second Loop: Now, pass the tag end through the larger loop that just formed.
- Moisten and Pull: Moisten the knot with a little saliva (this reduces friction and prevents line damage) and pull on the main line slowly and firmly until the knot cinches down tightly against the hook eye.
- Trim: Trim any excess tag end, leaving about 1/8 inch.
Practice this a few times at home before you get to the water. It might feel clumsy at first, but it quickly becomes second nature. This fundamental knot will serve you well for almost all your basic fishing needs.
Assembling the Bobber and Bait Rig
Let's put all those components together in the right order.
- Attach the Hook: Start by tying your hook to the very end of your main fishing line using an Improved Clinch Knot.
- Add Split Shot Weights: About 6 to 12 inches above your hook, pinch one or two small split-shot weights onto your line. You want just enough weight to allow your bait to sink and keep your bobber upright. If your bobber is lying flat on the water, you need more weight. If it's sinking, you have too much.
- Attach the Bobber:
- For Clip-on Bobbers: Simply press the button on the top or bottom of the bobber, clip it onto your line a few feet above your weights, and release. You can adjust its position up or down to change how deep your bait sits in the water.
- For Slip Bobbers: First, slide a bobber stop onto your line (follow the instructions that come with the bobber stops – usually involves threading your line through a small plastic sleeve and then pulling the knot off onto your main line). Then, slide a small bead onto the line, followed by the slip bobber itself. The bobber stop will prevent the bobber from sliding all the way down to your weights. You can adjust the bobber stop up or down your line to control the depth of your bait. This is a bit more involved but offers much more flexibility.
- Bait Your Hook: Now for the tasty part!
- Worms: Hook a worm once or twice through the body, leaving the ends dangling. You want it to look natural and enticing.
- PowerBait/Marshmallows: Pinch off a small piece, roll it into a ball, and completely cover the hook point and shank. You want the bait to look like a small, colorful nugget.
- Corn: Put 2-3 kernels directly onto the hook, ensuring the hook point is exposed or just barely hidden.
There you have it! Your bobber and bait rig is ready for action. Double-check all your knots by gently tugging on them, and make sure everything is secured properly.
The Art of Fishing with Bobber and Bait
Now that your rig is set up, it's time to actually go fishing! While it's a simple technique, there are still a few things you can do to maximize your chances of success and truly enjoy the experience.
Casting Your Line
Casting a spinning rod is one of the easiest skills to learn.
- Open the Bail: Hold the rod with your dominant hand, placing your index finger on the fishing line just above the reel. With your other hand, open the bail (the metal arm on the reel that holds the line in place).
- Bring the Rod Back: Swing the rod back over your shoulder, bringing the tip to about the 10 or 11 o'clock position (if your rod were the hour hand of a clock face). Your bait should hang about 1 to 2 feet from the rod tip.
- Swing Forward: Smoothly bring the rod forward, aiming for your target. As the rod passes about the 1 or 2 o'clock position, release your index finger from the line.
- Close the Bail: Once your bait hits the water, immediately close the bail with your non-dominant hand or by turning the reel handle. This prevents more line from coming out and allows you to reel in any slack.
Practice in an open field or a safe area without obstacles. The key is a smooth, continuous motion, not a jerky heave. Accuracy will come with practice. Aim for areas where fish might be hiding, like near submerged structures, weed beds, or along drop-offs. For some of Utah's urban community ponds, you might even find easy access points. Remember to check out Best Fishing Spots for Beginners in Utah to help you choose a good location for practicing your casting.
Waiting for the Bite
This is where the bobber truly shines. Once your bait is in the water, watch your bobber intently. It's your window into the underwater world.
- Subtle Nudges: Sometimes the bobber will just twitch or make small dips. This might be a curious fish investigating, or gently mouthing the bait. Be ready, but don't set the hook yet.
- The Dance: A more aggressive fish might make the bobber bounce and bob vigorously. This is a good sign!
- The Disappearance: The most exciting moment! When the bobber completely submerges and starts moving horizontally, that's your cue. A fish has taken the bait and is swimming away with it. This is the time to set the hook!
Patience is key. Some days the bite is instant, other days you might wait a while. Enjoy the scenery, listen to the sounds, and just relax. Fishing isn't just about catching; it's about being out there.
Setting the Hook and Reeling In
When that bobber goes down, your adrenaline will spike! Here's how to seal the deal:
- Reel in Slack: Quickly reel in any slack line until you feel direct tension with the fish. This ensures a solid connection.
- Set the Hook: Firmly lift your rod tip straight up, about 1 to 2 feet. Don't yank it wildly; a firm, quick sweep is usually enough. This drives the hook into the fish's mouth.
- Keep the Line Tight: Once the hook is set, keep your rod tip up and maintain constant tension on the line. This prevents the fish from throwing the hook. Reel in steadily, letting the rod's bend and the reel's drag do the work. If the fish pulls hard, let the drag on your reel slip rather than trying to force it in, which could break your line.
- Landing the Fish: Once the fish is close to shore or the boat, use a net if you have one, or gently grab it if it's a smaller fish and you're comfortable. Handle fish carefully, especially if you plan to release them.
Remember, fish can be a bit tricky. You might miss a few bites – that's totally normal! The more you fish, the better you'll get at recognizing a true bite versus a nibble. Mastering How to Set the Hook on a Soft Bite From Trout is a skill that comes with practice.
Common Mistakes and How to Avoid Them
Even with a simple bobber and bait setup, beginners can fall into a few common traps. Being aware of these can save you a lot of frustration.
Using Too Much or Too Little Weight
This is a very common issue. If you use too much weight, your bobber will sit too low in the water, or even sink entirely, making it hard to see bites. It also makes your presentation less natural, and fish might be wary. Conversely, too little weight means your bait won't sink effectively or your bobber will lay flat, again making it impossible to detect bites.
- Solution: Experiment! Start with one small split shot. If your bobber is lying flat, add another. If it's sinking, remove one. The ideal is for the bobber to stand mostly upright with just the tip or a small portion showing above the water. This gives the fish the least resistance when they pull, and the bobber will dip dramatically when a fish takes the bait.
Not Adjusting Your Depth
Fish don't always hang out on the bottom. Sometimes they're suspended in the middle of the water column, or near the surface, depending on temperature, time of day, and what they're feeding on. If your bait is always at the same depth, you might be missing fish.
- Solution: If you're not getting bites, try adjusting the position of your bobber. Move it up a foot, wait 15 minutes. Move it down a foot, wait again. This is easier with a slip bobber, but even with a clip-on, you can reposition it. Observe other anglers around you – are they catching fish at a certain depth? Try to emulate their success. Sometimes fish are just a few feet below the surface in the morning, then move deeper as the sun gets high. Being flexible with your depth is key to finding where the fish are holding.
Over-Baiting Your Hook
While you want enough bait to be enticing, putting too much on your hook can be counterproductive. It makes the bait less natural, harder for the fish to swallow, and can even obscure the hook point, leading to missed hook sets.
- Solution: For worms, a section about 3-4 inches long that's hooked once or twice is often perfect. For PowerBait or marshmallows, a pea-sized ball that completely covers the hook is all you need. The goal is to present a tasty, easy-to-eat morsel, not a giant buffet that's hard to get into their mouths. Smaller, more frequent re-baiting is usually better than one massive lump.
Not Setting the Hook Quickly Enough (or Too Quickly)
Beginners often struggle with when to set the hook. Waiting too long allows the fish to swallow the hook too deeply (making release difficult) or spit it out. Setting it too soon means the fish hasn't fully taken the bait.
- Solution: Pay close attention to the bobber. For trout and panfish with worms or PowerBait, generally wait until the bobber disappears completely and starts to move horizontally. That's a strong indicator the fish has it. For more aggressive fish, or if you're using live minnows, you might wait a little longer to ensure they have the whole bait in their mouth. It's a feel you develop over time, but generally, a firm, immediate upward sweep when the bobber disappears is a good rule of thumb.
Ignoring Local Regulations
It's easy to get caught up in the excitement of fishing, but ignoring Utah's fishing regulations can lead to fines and frustration. Rules cover everything from catch limits and tackle restrictions to specific dates and times for certain waters.
- Solution: Always consult the current Utah Fishing Regulations Explained before you go. Pay attention to daily bag limits (like Utah Trout Daily Limit Explained), specific water rules, and any bait restrictions. If you're fishing a specific water body, like Strawberry Reservoir or Flaming Gorge, always check for any unique rules that apply there. Being informed is part of being a responsible angler.
Remember, fishing is a journey, not a destination. There will be days you catch a lot, and days you catch nothing. The most important thing is to enjoy the process, learn from each outing, and appreciate being outdoors in beautiful Utah. Happy fishing!
Disclaimer
This article is for general informational purposes only and does not constitute professional advice. Laws, prices and regulations vary by location and change over time. Consult a qualified professional for guidance on your specific situation.